All but the simplest of software applications are designed to function or behave differently depending on the operational settings applied. Once the software is installed, we often forget that these settings exist and use the application in blissful ignorance. However, with the case of Microsoft Project, that ignorance is often not blissful and may encourage sub-optimal use of the tool. The purpose of this article is to make the reader aware of how the most important of these settings affects the way in which the application behaves and how they should be altered.
Accessing the Options
Like all Office Applications, Microsoft Project’s operational behaviour is controlled via the options, which can be accessed via the File menu. The options available to the user far outweigh the real estate available on screen, so they are logically organised into groups and can be accessed via the tabs at the left of the dialog box. Within each tab, the options are then organised further into additional groupings, all designed to make it easier to locate the option you are looking for.
The screen below shows the first few options of the Advanced tab for MS Project 2016:

An important distinction to make between the various settings is that they can affect the behaviour of the application, the current project file you are working on, or all new project files you create. Understanding the difference is important to effectively work with the settings and reduce future frustration.
You can readily differentiate between options that affect the application from those that affect individual files. Any group of options that affect individual files will have a drop-down list to the right of the group heading to highlight which project file the settings will apply to. If this is not present from the group heading, then the option applies to the application, irrespective of the file opened.
AMO Recommended Options
Of the many available options in MS Project to the user, there are 5 that we believe are invaluable to any project. They all relate to how tasks are scheduled. To understand why these options are so important, we must revisit the primary purpose and goals for developing a schedule:
- A schedule models how / when the project will be delivered, and
- Any change to the project will provide a reliable forecast of the remaining tasks in the schedule.
Setting the options as described in the following sections helps to promote the schedule as a predictive model of the project.
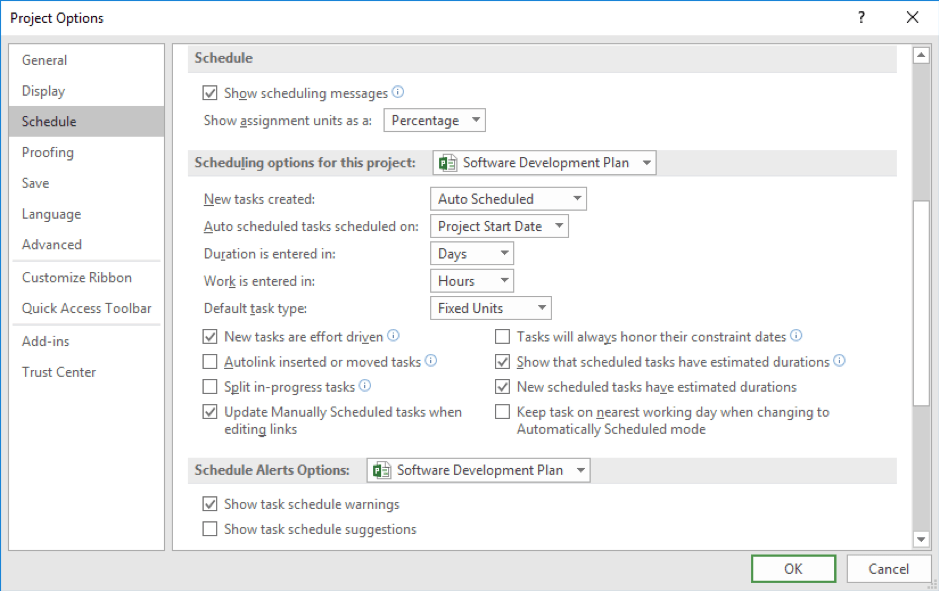
New tasks created
MS Project introduced Manually Scheduled tasks with version 2010. This allowed for flexibility of use but at the expense of reliability in forecasting. Unfortunately, it was also set as the default option for all new projects created.
The preference is to always have new tasks added as Automatically Scheduled.
Auto scheduled tasks schedule on
When you add a new task to a project, it has to have a start date. Two options are available, Current Date or Project Start Date.
The preference is to use the Project Start Date option. The reasoning for this is that even though proven practice demonstrates that all tasks with the exception of a project start milestone should have a predecessor, and eventually one will be added, having MS Project commence a task on a Project Start Date instead of the Status Date immediately calls to attention that the tasks is missing a predecessor and can be quickly rectified.
Auto link inserted or moved tasks
This is one of the most undesirable options to enable and should be turned off. Its designed to make it easy to link and relink tasks when you insert new tasks or move them around but is dependent on tasks following only finish to start relationships. Unfortunately, if you forget about this option and re-order your tasks, they will also be re-sequenced and you may not notice the change.
Split in-progress tasks
When work is in progress and gets delayed, this option allows MS Project to split tasks. These appear as dotted lines on the Gantt chart, but an unchanged duration. This can lead to seemingly contradictory data displayed in the schedule. For example, a 4-day task with a 5-day split in the middle will appear to span over 9 days. It can lead to being misconstrued, especially if the data is used externally to MS Project.
Like the auto link feature mentioned previously, splitting in-progress tasks is another example of MS Project being helpful that is best disabled.
Tasks will always honour their constraints
The scheduling engine in MS Project uses a number of factors to determine start and finish dates, including links and constraints. Constraints, as the term implies, constrain the scheduling engine from scheduling a task earlier or later than the links between tasks will allow and this is not the preferred behaviour. You cannot always avoid using constraints, so when a task contains both a link and a constraint, turning this option off will allow the scheduling engine to effectively override the constraint if applicable.
In Summary
There are many more options worth exploring that will enhance your experience with MS Project, but the ones mentioned here are the most important ones.
To summarise:
- Know that MS Projects behaviour will alter depending on which options you select
- Be aware of the most important MS Project settings to fostering the development of a responsive and predictive schedule
- Understand that settings can sometime ‘reset’ inadvertently, so don’t just set and forget but check them occasionally or whenever the application is not behaving as expected.
Experiment with the options turned on an off to view the changes in application behaviour and how tasks are scheduled.
